How to Install a Typewriter Ribbon
Typewriter ribbons are essential if you plan on using your typewriter, which many people still do. If you are having difficulty finding a ribbon for your typewriter(s), I sell universal typewriter ribbons here.
|
|
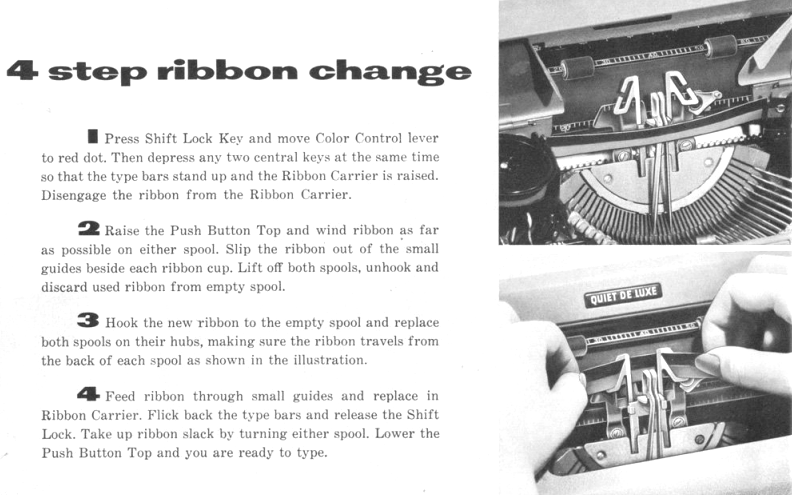
Excerpt from a 1953 Royal Quiet De Luxe manual illustrating the basic process of changing a typewriter ribbon. Note that parts of step 2 and 3 involve re-threading the ribbon. If you purchase a twin-spool ribbon, simply remove the old spools from the typewriter and install the new spools, and feed the ribbon through the ribbon carrier/vibrator as shown in the two pictures.
- If your typewriter has spool covers, or any sort of cover which covers part of the type-bar mechanism and the ribbon spools, be sure to remove it, or put the cover up just as you would with the hood on a car. Sometimes the spools may remain uncovered depending on the model- if that is the case, just ignore this step.
- Before removing the old ribbon from the ribbon carrier/vibrator (the part where the ribbon is threaded through the area where the typeheads strike paper.) note very carefully how the ribbon is threaded through the ribbon vibrator. Unfortunately, there are way too many ribbon vibrator designs to inform you about and take pictures of, but it is rare that you will come across a vibrator that is all that challenging. For some basic help, see the pictures in the instructions manual excerpt above.
- With the cover(s) still in the up position (if applicable), remove the old ribbon spools from the spool holders on the typewriter. There may be a metal piece holding the spool to the holder (known as a spool catch). Just disengage this piece from the spool, and lift the spools straight up and out.
- After taking note of how the ribbon is threaded in the ribbon vibrator, you can now un-thread it from the vibrator. Doing this may also help in the noting of how the ribbon was threaded in the vibrator to begin with.
- Place the two new spools inside the ribbon spool holders until they are completely fit properly. There may be a "conveyor pin" which fits into one of the small, several holes surrounding the center of the spool. It is also very important to note that when installing a ribbon that is two colors, always remember the phrase "black over red." If you install the ribbon up-side down, then the ribbon color selector will have to be used backwards, and it won't look professional.
- Thread the ribbon through the guides that are located somewhere in between the spool holders and the vibrator. These guides are usually found closer to the spool holders, and sometimes also serve as a ribbon reverse lever, even if they aren't necessarily a lever. They also assist in guiding ribbon to and from the ribbon vibrator/carrier.
- The next step is to thread the ribbon through the ribbon vibrator. To make it easier, depress the shift lock key, put the ribbon color selector on red if the typewriter has a color selector, and jam two typebars so the ribbon vibrator/carrier stays in the upmost position (see the manual excerpt at the top of the page for reference). Then, holding the ribbon between the thumb and first finger of each hand, slip the ribbon in behind the two tiny fingers in the middle of the guide at the top. I find it helpful to put the ribbon temporarily behind the vibrator completely, and then threading it in to the slots. If you can't remember how the ribbon is supposed to feed through the ribbon carrier/vibrator, reference the typewriter's instructions manual. If you do not have access to a manual, check this website: http://site.xavier.edu/polt/typewriters/tw-manuals.html
- Once the ribbon is properly installed in the spool holders and threaded into the vibrator, you aren't quite done yet. It is important to roll a piece of paper in the typewriter and test it out. But first, wash your hands- your fingertips are likely covered in ink, and you don't want to cover your typewriter in black fingerprints.
- The first thing to look for is that the ribbon spools are advancing, or taking in ribbon on one side, and giving off ribbon on the other. More than likely, everything will work fine, but sometimes there may be issues. If the ribbon spools aren't taking in ribbon as they should, then you either have a mechanical problem, or you need to install the ribbon spools on opposite sides. Certain typewriters will take ribbon either clockwise, or counter-clockwise, so that's something to figure out if that is indeed the problem.
- Another thing to look for when typing to test the new ribbon is that shifting with both red and black characters don't jam or tangle the ribbon with the vibrator, or even the type guide. If this is happening, it is likely that you threaded the ribbon through the vibrator incorrectly, or the vibrator is bent and needs to be bent back in the correct position.
- If the characters are typing fine, and they are printing as you desire, then you can shut the covers, or place them back on. Release shift lock and the red on the ribbon color selector if you didn't already from testing the ribbon. You are done!
You can also watch a few videos on YouTube, such as this one:
https://www.youtube.com/watch?v=JLnFJHN-068
Additionally, you can refer to the instructions manual for your specific typewriter model. Most manuals have a section on how to change the ribbon on the typewriter, particularly because the process may vary slightly from model to model. If the original manual for your typewriter is missing, you can download a photocopied version for free here:
site.xavier.edu/polt/typewriters/tw-manuals.html
|
|
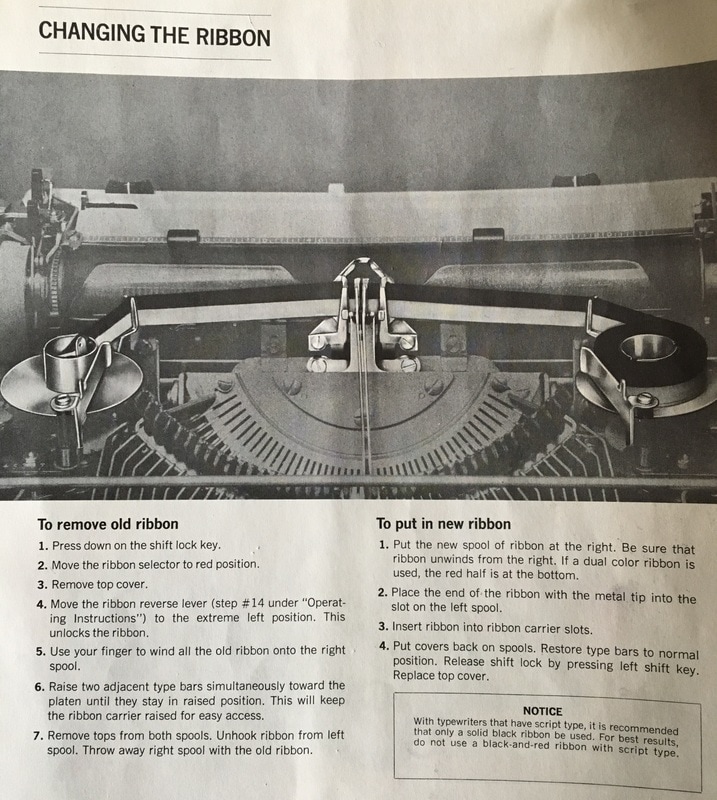
How to change the ribbon on Remington typewriters without interchangeable spools:
|
These very helpful instructions are from a Remington Mark II typewriter manual, and describe the process of changing the ribbon on a typewriter without interchangeable spools. Other common Remington (and Underwood Noiseless) models have the same built-in style spools, with the same similar procedure for changing the ribbon. These models include: Remington Travel-Riter, Letter-Riter, Quiet-Riter, Miracle-Tab, Ten-Forty, Model 1, All Remington and Underwood Noiseless models, and a few others.
Note: If you buy the universal spools we sell on our site, you can simply push out the core of the spools, which allows our spools to fit perfectly in the aforementioned typewriters (such as the one in the YouTube video). For more specific guidance and ribbon reverse switch locations, refer to the instructions manual for your specific model of typewriter. If the original manual for your typewriter is missing, you can download a photocopied version for free here: site.xavier.edu/polt/typewriters/tw-manuals.html |
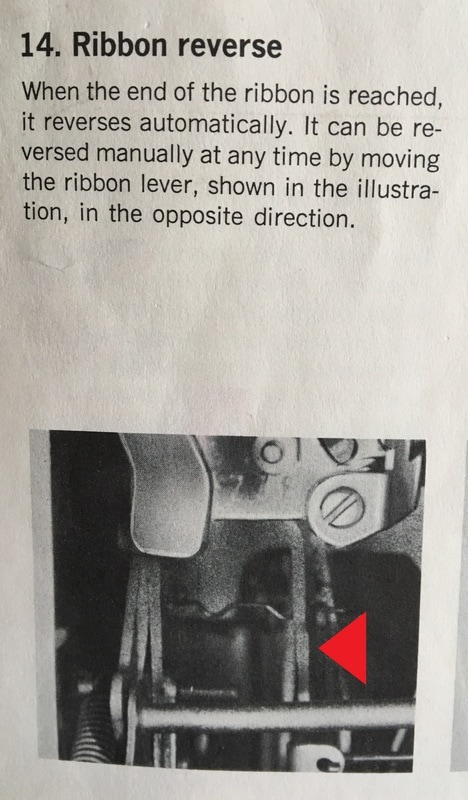
Note: The ribbon reverse switch for your model may be located in a different location. This picture is from a Remington Mark II manual. Always refer to the instructions manual for your specific model.
|
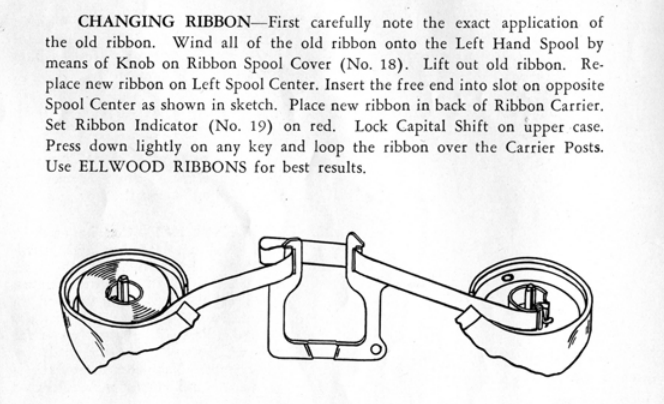
Yet another picture showing the same process- this time on an Underwood Noiseless 77 portable.
|
|
If you are still having trouble with installing the ribbon on your typewriter, feel free to contact us for some help!